Tech Advice3rd December 2015
Deaf and Self-Employed - Tell People How to Contact you
Deaf Friendly guide to help people contact you by building your own free website!
 Over the years, we have bumped into highly skilled and motivated deaf people who are struggling to find work, some for years at a time. Taking things into their own hands, some of these people decide to take the leap into being self employed as carpenters, electricians, teachers, gardeners, builders, bakers etc. Whatever the job, and with first contact communication so important for deaf people trying to run a business, it's always useful to have a website for your business, so that people can contact you via deaf-friendly routes, like email or text.
Having a website also allows people to search for you through search engines (like Google, Yahoo and Bing) as well as giving you an opportunity to tell people what you do, display a portfolio of your work to show the public what you can do, and use positive feedback from past customers to reassure new ones about the quality of your work.

 Despite the usefulness of a website, many self employed deaf-run businesses don't have one, and chatting to some of the people involved, a lack of knowledge about building a website, the costs involved and sheer fright at the thought of doing one, are the major barriers to finding work through the world wide web. Years ago, it would have been impossible to even contemplate doing a simple - here's what I do and this is how to contact me - website, but today it's really quite simple.
Because people rely so heavily on the website these days, we thought it would be a good idea to guide you through making your own website, with step-by-step instructions that should be easy for everyone to follow.
The company that we will use for this guide is called Weebly. There are plenty of other sites that offer website building, but are using Weebly because it is a really simple 'drag-and-drop' interface that allows you to build websites easily. It has a good range of themes/templates to use that you can swap at any time and the websites look great on mobile devices. You can also get started and get a website up on the world wide web completely free. With no past experience, one hour is all it takes to get a one page website with your photos and contact details up on the web.
Getting Started

Head over to www.weebly.com and press the 'Try it Free' button.

Fill out your name, email address and choose a strong password and click 'Sign Up Free'. You will then be asked to choose what type of website you will be making: Site, Blog or Store - for a business-focussed website we will be choosing 'Site'.

Choosing a theme and domain
You will now be asked to choose a theme for your website. Have a look through the options and see which of the previews you like best. Don't worry too much about colours and the photographs used - usually all of those can be changed later, just try to focus on the style and layout; think about things like:
- Do you like where the menu is?
- Do you like that it does/doesn't have a large image on the home page?
- Does it look professional?
- Does it match with your job? (E.g. A food theme might be great for a chef - but not for an electrician!)
- Does it tell people how to contact you?
These are the sorts of questions that will help you choose a theme that you think best suits you and your business.

One of the great things about Weebly, is that you don't have to worry too much about the theme here. If you start building your website and decide that you don't like it anymore, it is really easy to change to another theme later.
Next up, you will be asked about choosing a 'website domain' - this will be the address for your new website. Eventually, you will be able to upgrade your website to have its own domain, so it will look like www.CarpenterMike.co.uk or www.BSLwales.com but this will cost money, so for now, while we are building and testing, just choose the first option 'A subdomain of Weebly'.

This means your address will end with weebly.com, so it will look like CarpenterMike.weebly.com

Decide your new address and type it into the top box to check if it is available (look for the green tick at the right). It is always good to choose something that links with your business or your name; don't choose EmmaTheChef if you're not a chef! When you are happy with your new address, click on Continue.
Editing your first page
You will now see something that looks like this (it may look a little different, depending on which theme you chose):

Now it is time to start clicking on things to change them so they match your name and business information. Try clicking on 'My Site' at the top left, or 'Click to add headline' to change the information to match your business information - something like this;

You can change the background image to something else just by clicking 'Edit Image' and choosing another image from the gallery that appears. After choosing an image, you are able to move it around, adjust the zoom and blurriness of the image and when you are done, just press 'Save' at the top-right to switch to the new background. You will be asked if you just want to change/save this page only or you can also have it change the image on all the pages of your website.

Next, scroll down below the image and you will see a big empty box that says, 'Choose a Layout' - this is where you start adding more structure and information to your home/welcome page, but don't be put off, it is a lot easier than you think. Just take it step by step.

When you click on, 'Choose a Layout', you will be given a number of styles to choose from - if you have lots of information to add about yourself/business, then choose one with plenty of space for typing, or you can choose one with plenty of pictures if you want to show off examples of your previous work.

When you click on a layout, Weebly shows you how that will look and lets you 'Cancel' to go back and look at other options. When you have found one you like, you can click on 'Keep' to add the layout to your page.

Now you can change the fake ("Lorem ipsum...") text with your information and contact details, give an idea about what services you can offer and try to include some of your own pictures too to show off your own work and skills. You don't have to write much. Sometimes short is best and let the photos do the talking.
To change a picture, click on the current picture that you want to change, then a menu pops up asking you to pick a new photograph from your computer. As soon as that is finished uploading to Weebly, your new image will appear on the website.

Adding/Editing other pages
Just a single page with good images and showing people how to contact you, will be beneficial to your business, but you can go further if you want to.
When you have finished your main ('Home') page you can start adding more pages to your new website, maybe you want a page to list your contact details with a contact form for people to fill out, or a photo gallery page to show off your excellent photography, food, or any other skills that show why they should be choosing you.
Click on 'Pages' in the menu bar at the top of the screen.

Using the list of pages here you can change between which page you want to edit (just click on the name of that page e.g. Home or Contact) and also add new pages using the '+' button.

When you first create your website, Weebly will automatically create 3 pages for you - Home, About and Contact. The Home page is the first page people see when they come to your website. If you can, you want it to grab people's attention and give them a quick idea of who you are, what you are offering and how to contact you. The About page goes into more detail about you and your work, where you are based, work you have completed before, recommendations or endorsements from past customers. The Contact page tells customers how they can get in touch with you - phone, SMS, email, Skype, WhatsApp - any ways that you would like people to be able to contact you.
When you have finished adding pages or want to return to editing a page, you should click on the 'Build' button on the top menu.
Adding words and pictures
 Adding information and pictures is really easy to do using Weebly's 'drag-and-drop' system. Using the menu you see on the left of the pages you can drag those boxes to add items to the page. If you want to add a paragraph of information - just pull over a 'Text' box onto the page. If you want to add an image to the page, click and drag the 'Image' box over to the main page. A blue line will appear to show you where you are about to 'drop' that text or picture into the page - so move it around until it's where you want it.


After adding your new text or image box you just have to click it to change it to what you want it to be. If it is a text box, it will say 'Click here to edit' - so do just that, click your mouse there and start typing your new information.

You will also see familiar icons you know from other applications like Bold, Underline, Italics, justify (move text to the left or right) and add numbers to a list.
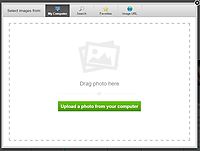
If you have added an image, instead of text, then you will see a box that says, 'Upload Image' - click this to add a picture from your computer to upload (send) to the web page or find other images on the Internet.

If you want to use your own image, press the big green button, 'Upload a photo from your computer', which will let you look at your computer's files to find the picture to add to the website.

You can also click on the button at the top that says 'Search' - here you can look for other pictures on the Internet that you can use on your web page - although remember to click on the tab that says 'Free Photos' - otherwise it wants you to pay £4 per picture!

Removing/Deleting things
To delete text or images from your design, you simply hold your mouse over the item you wish to delete and an X appears in the top right corner - just press that to remove the item from your page. A confirmation box will pop-up to double-check that you really meant to remove it - just press the red 'Delete' button to confirm - or click somewhere else if you have changed your mind.

It's beautiful - I'm ready to show the world!
When you have finished adding all the information and pictures that you want to add to your web pages you need to make it available on the Internet for everyone to find - by publishing it. In the Weebly menu bar (at the top-right of the screen) you will see an orange button that says 'Publish'.

It might ask you to confirm the domain address details that we covered earlier and then to confirm that you are a real human and not a robot by typing in some words or numbers from a picture. You should then click the orange button that says 'OK, publish my site!'

Now your website is finally ready and published, you can access it using the address you created. All of the free websites will finish with weebly.com - like our example of RobTheBuilderUK.weebly.com
Getting Help
Weebly has a range of easy to follow help guides and answers to common questions which you can access at any time by clicking on the '?' icon at the top-right and clicking on 'Support Centre'.

Using your own domain/address (upgrading)
Later on, you can swap to use your own custom domain name address (e.g. www.Julie-AmazingFlowers.co.uk), but in order to do this, you must upgrade your Weebly account from the Free version to the Starter version which currently costs £58 + VAT for one year or £78 + VAT for 2 years.
Article by SL First Tech Team
posted in Technology / Tech Advice
3rd December 2015